Low-Voltage Wiring Safety Do’s and Don’ts
Low-Voltage Wiring Safety Do’s and Don’ts
Ever thought about adding smart lighting to your garden, installing a new security system, or finally getting that perfect home theater setup? These projects often involve running low-voltage wiring, and while it's generally considered safer than standard household electricity, understanding the do's and don'ts is crucial for a successful and safe installation.
Low-voltage wiring plays a vital role in modern homes and businesses. From powering your internet connection to enabling sophisticated home automation systems, it's the backbone of many conveniences we rely on daily. But just because it's "low voltage" doesn't mean it's without risk. Improper installation or maintenance can lead to system failures, fire hazards, and even electric shock. This guide provides essential safety tips and practical advice to help you navigate the world of low-voltage wiring safely and effectively.
Understanding Low-Voltage Systems
Before diving into the specifics, let's clarify what we mean by "low voltage." Generally, low-voltage circuits operate at 50 volts or less. Common applications include: Smart Home Systems: Lighting control, smart thermostats, and automated blinds. Security Systems: Security cameras, alarm systems, and doorbells. Networking: Internet cabling (Ethernet), telephone lines, and cable TV. Landscape Lighting: Garden lights, pathway lighting, and accent lighting. Home Entertainment:Speaker wires, HDMI cables, and other audio/video connections.
While the voltage is lower, these systems still require careful planning and execution to ensure safety and optimal performance.
Essential Safety Do's
Here are key safety practices to follow when working with any type of low-voltage circuit:
1.Always Disconnect Power: Even though it's low voltage, always disconnect the power source before working on any wiring. This prevents accidental shocks and potential damage to your equipment. For example, if you are working on landscape lighting, unplug the transformer. For in-home wiring, disconnect the power supply at the breaker or unplug the device.
2.Use the Right Tools: Invest in quality tools designed for working with low-voltage wiring. This includes wire strippers, crimpers, multimeters, and cable testers. Using the right tools ensures clean, secure connections and prevents damage to the wires.
3.Read the Instructions: Always consult the manufacturer's instructions for any device or system you're installing. This will provide specific wiring diagrams, voltage requirements, and safety precautions.
4.Proper Cable Management: Neat and organized wiring isn't just aesthetically pleasing; it's also essential for safety and troubleshooting. Use cable ties, labels, and conduit to keep wires bundled and protected. This prevents them from becoming tangled, stressed, or damaged.
5.Label Everything: Labeling wires and connections makes troubleshooting much easier. Use a labeling machine or write clearly on cable tags to identify each wire's purpose and destination. This saves time and reduces the risk of errors when making changes or repairs in the future.
6.Test Your Work: After completing any wiring project, test the connections with a multimeter or cable tester to ensure proper voltage and continuity. This verifies that the wiring is correct and that there are no shorts or open circuits.
7.Respect Wire Polarity: In many low-voltage applications, polarity matters. Incorrect polarity can damage devices or cause them to malfunction. Pay close attention to the markings on the wires and follow the wiring diagrams carefully. Typically, red wires are positive and black wires are negative.
Critical Safety Don'ts
Avoid these common mistakes when working with low-voltage wiring:
1.Don't Overload Circuits: Each low-voltage circuit has a maximum current capacity. Overloading a circuit can cause the wiring to overheat, leading to a fire hazard. Calculate the total current draw of all devices connected to the circuit and ensure it doesn't exceed the rated capacity of the power supply or wiring.
2.Don't Use Damaged Wires: Inspect wires for any signs of damage, such as cuts, fraying, or exposed conductors. Damaged wires can cause short circuits and pose a shock hazard. Replace any damaged wires immediately.
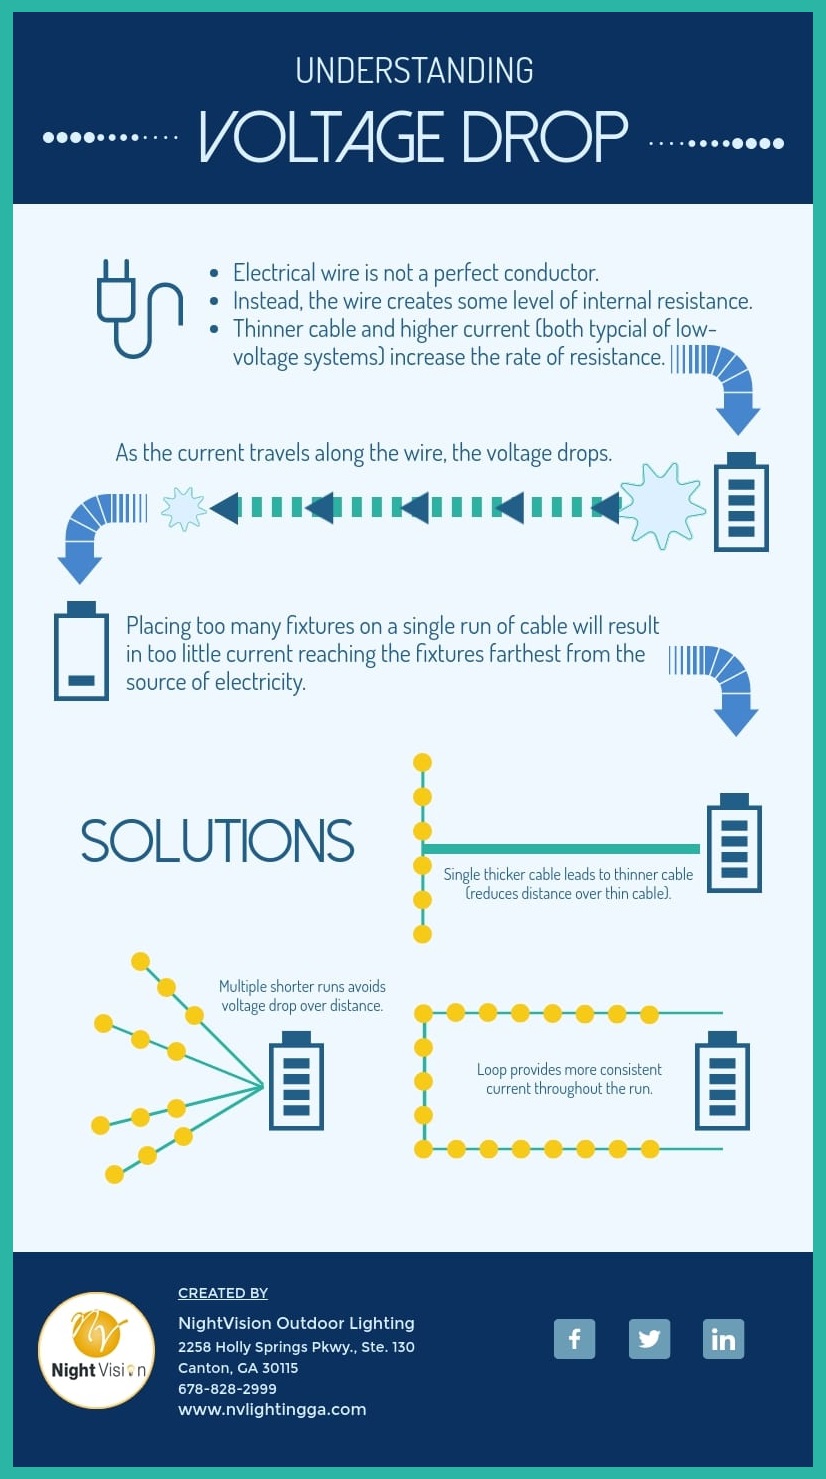
3.Don't Ignore Wire Gauge: Using the correct wire gauge is essential for safety and performance. Thicker wires can carry more current without overheating. Consult a wire gauge chart to determine the appropriate gauge for your application, considering the distance and current draw.
4.Don't Run Low-Voltage Wiring Parallel to High-Voltage Wiring: To minimize interference, avoid running low-voltage wiring parallel to high-voltage wiring. If they must cross, do so at a 90-degree angle. This reduces the risk of electrical noise affecting the performance of your low-voltage systems.
5.Don't Bury Unrated Cables: Outdoor low-voltage wiring, such as that used for landscape lighting or security wiring, needs to be direct burial rated. Regular indoor cables are not designed to withstand moisture and soil conditions, and can quickly deteriorate, creating a shock hazard.
6.Don't Neglect Weatherproofing: When installing outdoor low-voltage wiring, ensure all connections and components are properly weatherproofed. Use waterproof connectors, enclosures, and sealant to protect against moisture, corrosion, and UV damage.
7.Don't Assume All Low-Voltage Systems Are the Same: Different systems have different voltage and current requirements. Always consult the manufacturer's specifications before connecting any devices or components.
Step-by-Step Guide: Installing Landscape Lighting
Let's look at a practical example: installing low-voltage landscape lighting.
1.Plan Your Layout: Determine the placement of your lights and the routing of your wiring. Consider factors like plant growth, traffic patterns, and desired lighting effects.
2.Choose the Right Fixtures and Cables: Select low-voltage landscape lighting fixtures and direct burial-rated cables that are suitable for outdoor use.
3.Install the Transformer: Mount the low-voltage transformer in a weatherproof location, such as on a post or wall near an outdoor outlet.
4.Run the Wiring: Dig a shallow trench (typically 6-12 inches deep) along your planned route. Lay the direct burial cable in the trench, ensuring it is protected from sharp objects.
5.Connect the Lights: Connect the landscape lighting fixtures to the cable using waterproof connectors. Make sure the connections are secure and properly sealed.
6.Test the System: Connect the transformer to the outlet and test the lights. Verify that all lights are working correctly and that there are no shorts or open circuits.
7.Bury the Wiring: Backfill the trench, covering the wiring with soil. Be careful not to damage the cable.
8.Conceal and Protect: Secure the cable along walls or structures, using fasteners that resist corrosion and the elements. Consider using conduit where the cable is exposed to potential damage.
Troubleshooting Common Issues
Even with careful planning and execution, you may encounter problems with your low-voltage systems. Here are some common issues and how to troubleshoot them: No Power: Check the power supply, circuit breaker, and connections. Use a multimeter to verify that voltage is present at the device. Dim Lighting: Check the voltage at the fixture. Low voltage can cause dimming. Ensure the wire gauge is adequate for the distance and load. Flickering Lights: This could indicate a loose connection or a faulty power supply. Inspect all connections and replace the power supply if necessary. Interference: Try rerouting the wiring to avoid proximity to high-voltage lines or sources of electromagnetic interference. Use shielded cables if necessary.
People Also Ask
Is low-voltage wiring safe to install myself?
While generally safer than standard voltage, low-voltage wiring still carries risk. It's best to have a solid understanding of electrical principles and safety practices. If you're unsure, consult a qualified electrician.
What type of wire should I use for low-voltage lighting?
Use direct burial-rated low-voltage cable for outdoor lighting. For indoor applications, speaker wire or category cables are generally suitable.
How do I test low-voltage wiring?
Use a multimeter to check voltage, continuity, and resistance. A cable tester can verify the integrity of network cables.
Staying Safe and Confident
Working with low-voltage wiring can be a rewarding experience, allowing you to enhance your home's functionality and security. By following these safety do's and don'ts, you can confidently tackle these projects and ensure a safe and reliable installation. Remember, when in doubt, always consult a qualified electrician. Your safety and the performance of your systems are worth it!
Posting Komentar untuk "Low-Voltage Wiring Safety Do’s and Don’ts"