Low-Voltage Security Wiring: Step-by-Step Setup Tips
Low-Voltage Security Wiring: Step-by-Step Setup Tips
Ever felt that pang of worry about your home's security while you're away? Or perhaps you're tired of tripping over unsightly cables snaking across your living room floor? Properly installed low-voltage wiring can address both these concerns, and a few more.
Low-voltage wiring is the backbone of many modern home systems, from security cameras and alarm systems to landscape lighting and smart home devices. Understanding how to set it up safely and efficiently is crucial for any homeowner looking to enhance their property's security, convenience, and value. It might seem daunting, but with the right knowledge and a bit of careful planning, you can confidently tackle many low-voltage wiring projects yourself. This guide will walk you through the essential steps.
Planning Your Low-Voltage Security System Wiring
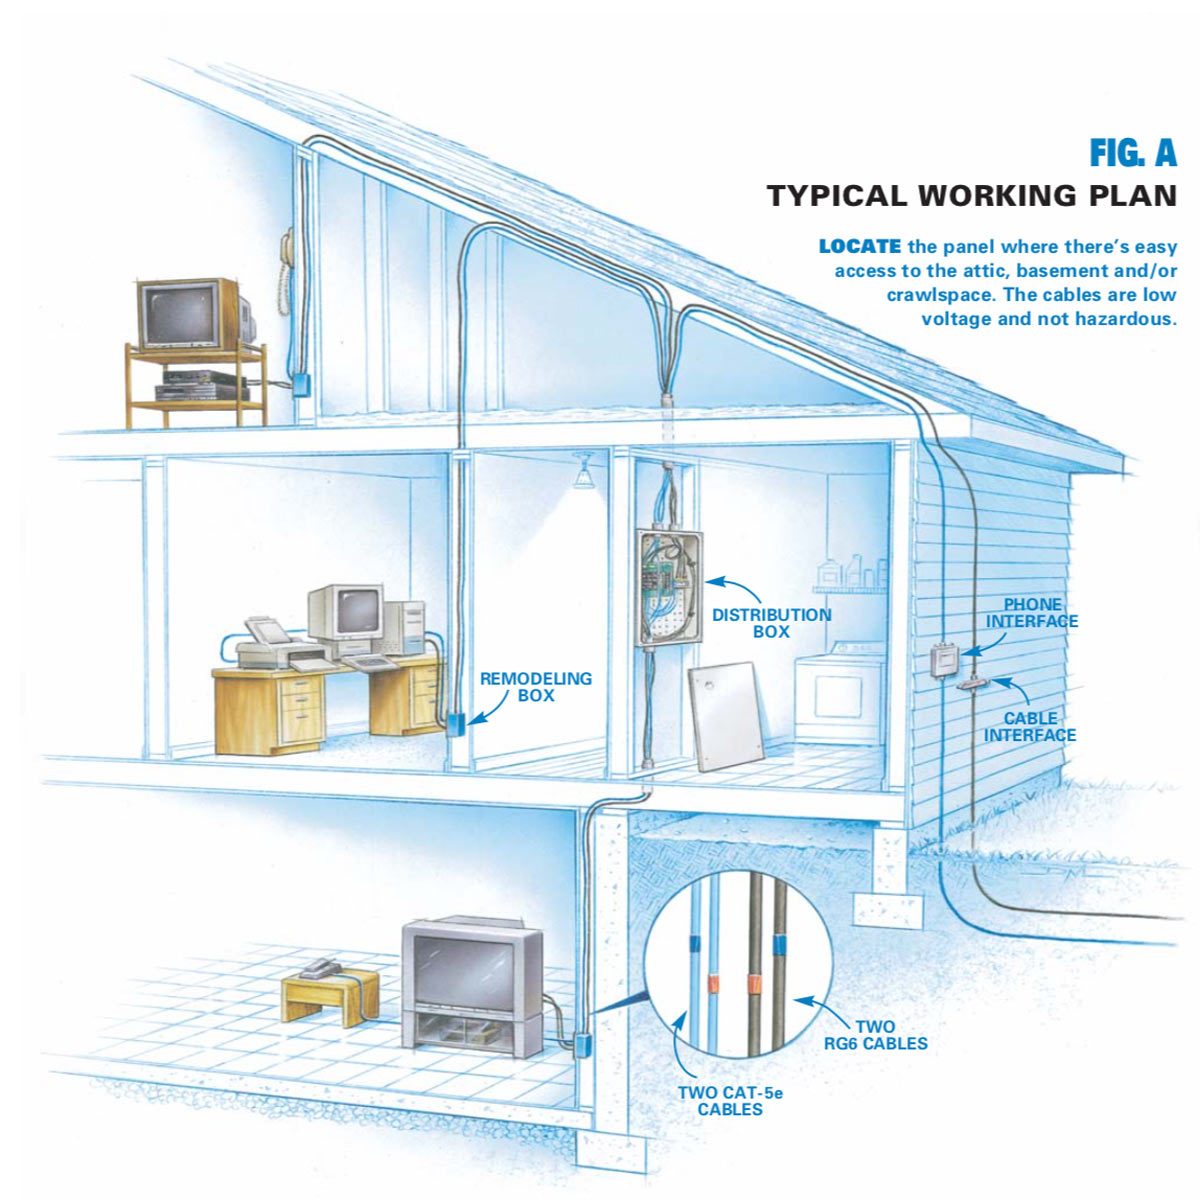
Before you even think about picking up a wire stripper, a thorough plan is essential. This isn't just about where the wiresgo; it's about ensuring your entire system operates reliably and safely.
Assess Your Security Needs:What are you trying to protect? Which areas are most vulnerable? Are you installing security cameras, motion sensors, door/window sensors, or a combination of these? Understanding your specific security needs will dictate the type and quantity of wiring required.
Create a Wiring Diagram: A detailed diagram is your roadmap. Map out the location of each device (cameras, sensors, control panels) and the path the wiring will take to connect them. Consider factors like wall thickness, obstacles (pipes, existing wiring), and accessibility. Use different colors to represent different types of wires (power, data).
Check Local Codes: Electrical codes vary by location. Before starting any wiring project, check with your local building department or a qualified electrician to ensure your plan complies with all applicable regulations. This is especially important for security systems, as incorrect wiring could lead to false alarms or system malfunctions.
Gather the Right Tools & Materials: Having the right tools makes the job significantly easier and safer. Here's a checklist: Low-voltage wire stripper
Crimping tool (for connectors)
Multimeter (for testing voltage and continuity)
Fish tape (for pulling wires through walls)
Drill with various drill bits
Screwdrivers (Phillips and flathead)
Cable ties or zip ties
Wire connectors (e.g., B-connectors, RJ45 connectors)
Low-voltage cable (appropriate gauge and type for your application – consult the device documentation)
Cable staples or clips
Voltage tester
Step-by-Step Installation Guide
Now, let's get to the practical part. These steps provide a general guideline, but always refer to the specific instructions for your security system components.
1.Safety First: Disconnect Power.Before working on any wiring, always disconnect the power supply to the circuit you'll be working on. Use a voltage tester to confirm that the power is off. This is non-negotiable.
2.Run the Wires:This is often the most challenging part. Use fish tape to pull the wires through walls, ceilings, or floors. Avoid sharp bends, which can damage the wires. Secure the wires with cable staples or clips every 12-18 inches to prevent them from sagging or becoming a hazard. For exterior runs, use weatherproof cable and conduit to protect the wires from the elements.
3.Terminate the Wires: Carefully strip the ends of the wires, exposing only the necessary amount of conductor. Use the appropriate crimping tool to attach connectors to the wires. Ensure the connections are secure and tight. Refer to the device manuals for the correct wiring configuration (e.g., pinouts for RJ45 connectors).
4.Connect the Devices: Connect the terminated wires to the corresponding terminals on your security devices (cameras, sensors, control panel). Double-check the wiring diagram to ensure everything is connected correctly.
5.Test the System: Once all the devices are connected, restore power to the circuit. Use a multimeter to verify the voltage at each device. Test the functionality of each component to ensure it's working as expected. Check for any error messages or alarms.
6.Cable Management: Proper cable management is essential for a clean and professional installation. Use cable ties or zip ties to bundle the wires together. Label each wire run to make troubleshooting easier in the future. Neatly arrange the wires in a central location, such as a wiring panel or enclosure.
Troubleshooting Common Issues with Security System Wiring
Even with careful planning, problems can arise. Here are some common issues and how to address them: No Power to Device:Check the power supply, the wiring connections, and the device itself. Use a multimeter to verify the voltage at the device. Look for any blown fuses or tripped circuit breakers.
Signal Interference: Interference can cause issues with security cameras or other devices that transmit data. Try rerouting the wires away from potential sources of interference, such as power lines or fluorescent lights. Use shielded cable to minimize interference.
Loose Connections: Loose connections can cause intermittent problems or complete system failure. Carefully inspect all the wiring connections and tighten any loose screws or connectors.
Incorrect Wiring: Incorrect wiring can damage devices or cause the system to malfunction. Double-check the wiring diagram and ensure that all the wires are connected to the correct terminals.
Essential Safety Tips for Low-Voltage Projects
Safety should always be your top priority when working with electrical wiring, even low voltage.
Always Disconnect Power: As mentioned earlier, this is the most important safety precaution. Never work on live wires. Use the Right Tools: Using the correct tools for the job minimizes the risk of electrical shock and ensures proper connections. Wear Safety Glasses: Protect your eyes from flying debris when cutting or stripping wires. Work in a Well-Lit Area: Good lighting helps you see what you're doing and reduces the risk of mistakes. If in Doubt, Consult an Expert:If you're unsure about any aspect of the wiring process, don't hesitate to consult a qualified electrician. It's better to be safe than sorry.
Home Automation Wiring Considerations
Beyond basic security, many homeowners are integrating smart home features. This requires careful planning of your network wiring.
Consider a Structured Cabling System: Structured cabling uses a centralized distribution point for all your low-voltage wiring, making it easier to manage and troubleshoot. Use High-Quality Cable: Invest in high-quality cable, such as Cat6 or Cat6a, to ensure optimal performance and future-proofing for your network. Plan for Future Expansion: As your smart home evolves, you'll likely add more devices. Plan for future expansion by running extra cables and leaving room for additional equipment in your wiring panel. Wireless vs. Wired: While wireless technology offers convenience, wired connections are generally more reliable and secure, especially for critical devices like security cameras.
People Also Ask:
What's the difference between low-voltage and high-voltage wiring?
High-voltage wiring typically refers to the standard household electrical system (120V or 240V), while low-voltage wiring operates at significantly lower voltages (typically 5V to 48V). Low-voltage wiring is used for devices like security systems, landscape lighting, and home automation equipment. The lower voltage reduces the risk of electrical shock and simplifies installation in many cases.
Can I use regular wire for low-voltage applications?
No. You should always use wire that is specifically designed and rated for low-voltage applications. Using the wrong type of wire can result in poor performance, overheating, or even fire hazards.
How do I know which gauge of wire to use?
The appropriate gauge of wire depends on the amperage and the distance the current needs to travel. Consult the device's documentation or a wire gauge chart to determine the correct size wire for your specific application. It's generally better to err on the side of using a slightly larger gauge wire than necessary.
Is it okay to run low-voltage wire alongside high-voltage wire?
It's generally not recommended to run low-voltage wire alongside high-voltage wire, as the high-voltage wiring can induce interference in the low-voltage wiring. If you must run them in parallel, keep them separated by at least 12 inches and use shielded cable for the low-voltage wiring. Where wires cross, do so at a 90-degree angle to minimize any potential interference.
Conclusion
Installing low-voltage security wiring might seem intimidating at first, but with a solid plan, the right tools, and a commitment to safety, it’s a manageable project for many homeowners. By following these tips and guidelines, you can enhance your home's security, improve its functionality, and add to its overall value. Remember to always prioritize safety and, when in doubt, consult a qualified professional. Embrace the process, take your time, and enjoy the peace of mind that comes with a well-wired security system. Now go forth and conquer those wires!
Posting Komentar untuk "Low-Voltage Security Wiring: Step-by-Step Setup Tips"